
As web developers, we’re all fairly aware of the fact that encrypting our sites is important. It’s safer for our users and boosts search engine ranking.
So, why have we avoided the topic for so long?
Personally, it’s been a matter of technicality and budget. I’m only a brand new VPS owner and I’m still excited over being able to SSH into my server wherever I want to get stuff done. Suffice it to say, I’m pretty new to installing and managing scripts and software via the command line.
Even if I were willing to shell out $30, $60, $100 or more for a SSL certificate, I didn’t feel confident to manage it or go through the process of installing it. The money, the hassle, and the general unknown all kept me at bay.
But things are changing. Now, I’m beginning the slow process of encrypting all of my sites and projects going forward. How? What made this possible?
Cost is now $0.00: LetsEncrypt allows you to generate your own certificates, totally free.
Hassle? Not really: Once you try it, you’ll realize it’s nowhere as tricky as you think.
Interested to get this going for your own site? To help you take your first steps into SSL, here’s a tutorial about what I did to get my free SSL certificates up and running (without blowing anything up).
Step 1: Collect Your Tools
- Root SSH access to your VPS (if you don’t know… learn SSH)
- Access to the WHM panel
- Read through the LetsEncrypt “Getting Started” tutorial to get familiar with the process
- List all the domains you need to encrypt
Let’s use this site, for example.
I wanted to ensure that the three main versions of my domain would be covered, so my list looked like this:
- annedorko.com
- www.annedorko.com
- my.annedorko.com
Now, before we can move forward you’ll need to make sure LetsEncrypt is installed on your server.
Log in to the server on SSH:
ssh root@vps
// Enter password:
$ root@vps [~]#
From here, you’ll follow the steps on the LetsEncrypt site for installing the client software.
$ git clone https://github.com/letsencrypt/letsencrypt
$ cd letsencrypt
$ ./letsencrypt-auto --help
Running ./letsencrypt-auto will effectively run the same as the plain letsencrypt command that you find in all of their tutorials, so you don’t need to worry if you’re getting a “Command not found” error when you try to run the plain command.
Simply ensure you’re the letsencrypt folder and run the same command using ./letsencrypt-auto
Step 2: Build Your SSL Command
This is where we refer to that domain list from before. I recommend setting up a unique certificate for each root domain. For me, it just helps things stay organized.
You can add as many domains as you want to your list for each certificate. In this situation, I had three.
Each domain gets added to the list by appending a new -d flag. My command looked like this:
./letsencrypt-auto certonly -d annedorko.com -d www.annedorko.com -d my.annedorko.comYou could just run this as-is, but in my case it required I paused my Apache HTTPD service first…
Step 3: Pause Apache Services
All the sites hosted on your server may need to come down for the few seconds it takes you to generate your certificates, because the process needs to be able to tap into Port 80 which is usually taken up by the Apache processes.
You might be able to use the basic apachectl stop and start commands depending on your specific VPS set-up, but my server didn’t like that.
My process looked like this:
$ service httpd stop
$ ./letsencrypt-auto certonly -d annedorko.com -d www.annedorko.com -d my.annedorko.com
$ service httpd start
This process:
- Stops Apache
- Generates your SSL certificates - you’ll see a lot of success or failure messages output here!
- Starts Apache again
This is all a pretty fast process, so your sites shouldn’t experience much downtime.
The LetsEncrypt success messages let you know where to find your certificate on the server. Make sure to take note of that file path for the next steps.
Step 4: Install Your Certificates
Okay, you’re getting close to being finished. LetsEncrypt presumably just created valid certificates available on your VPS to encrypt your sites – but now you need to make sure your server knows about them.
In order to do that, you’ll need to login to WHM. My version is 54.0.
Look for ‘SSL/TLS’ on the left hand menu items. Under this menu you’ll have the option to ‘Install an SSL Certificate on a Domain’. Let’s click on that.
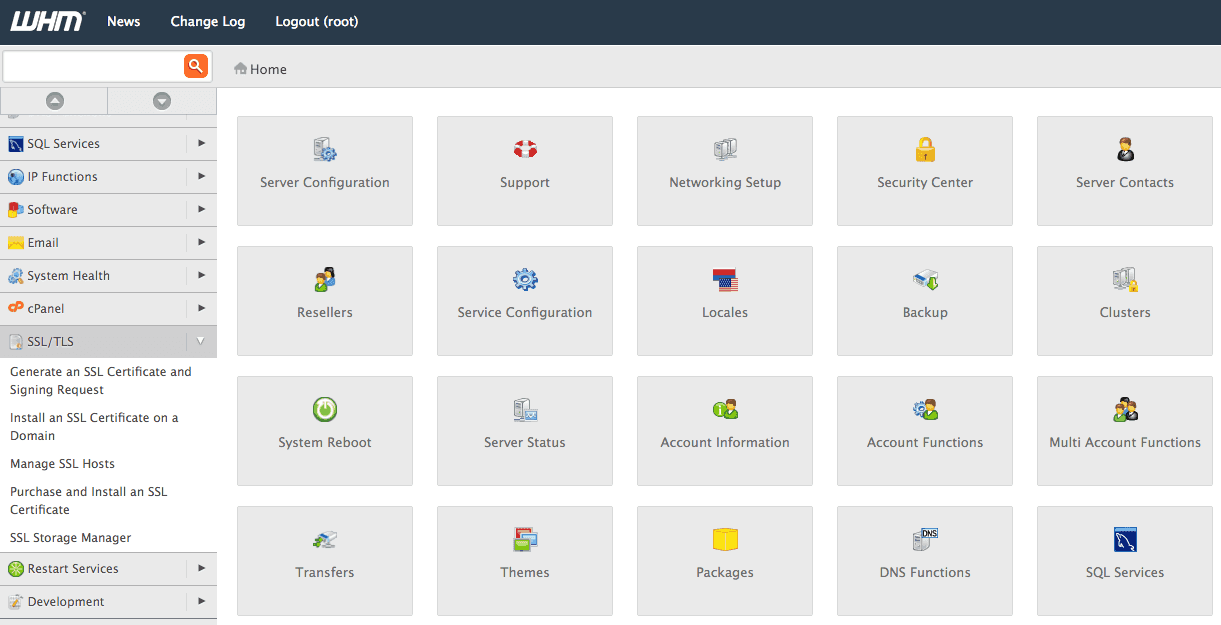 Screenshot: Finding SSL Certificate in the WHM Admin
Each of your domains and subdomains requires its own installation of your certificate. In my situation, I needed to register the same certificate three times to cover all of my use cases.
There are three main sections you’ll have to fill out. WHM doesn’t automatically find LetsEncrypt certificates yet, so we need to fill in our data manually.
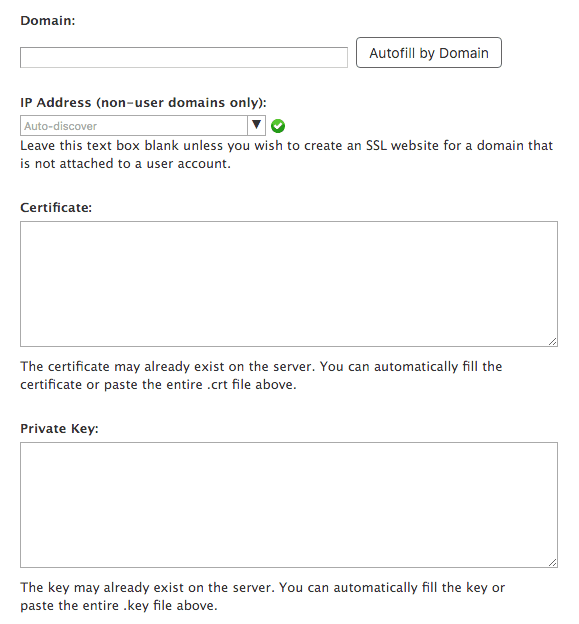 Screenshot: Adding SSL Certiciate in WHM Admin
The Domain
Each domain gets its own unique certificate installation, even if it’s all based on the same certificate.
So that meant I installed the certificate three times: Once each for annedorko.com, www.annedorko.com, and my.annedorko.com because they can only go in one at at a time in the Domain field.
Certificate
For this step and the next, hop back into your SSH command line and make sure you’re still logged into your server.
The location of your specific certificates were told to you earlier during the LetsEncrypt process, but here’s what mine looked like. Yours are probably somewhere similar (but in your own domain root!).
/etc/letsencrypt/live/annedorko.comLet’s go in that folder and check out what’s inside.
$ cd /etc/letsencrypt/live/annedorko.com
$ ls
./  ../  cert.pem@  chain.pem@  fullchain.pem@  privkey.pem@
The certificate is under cert.pem — let’s copy the data.
$ vi cert.pemThis will open the file so that you can copy all the information inside. Carry that over to your WHM and paste it into the “Certificate” section.
It will tell you instantly whether it is recognized as valid or not. Make sure you’ve copied the contents of the file exactly to avoid errors.
Private Key
We’ll repeat the same process here, only using the privkey.pem file!
$ vi privkey.pemCopy and paste the contents from this file into WHM where it asks for the Private Key.
At this point you can scroll all the way to the bottom and click “Install”.
That’s it! Your certificate is installed for that domain now. Rinse and repeat until all of your subdomains are covered.
Live Usage Notes
Your site will not automatically point to HTTPS unless you tell it to from the front end.
First, test that it’s all working by trying out the https:// protocol in front of one of your now-encrypted domains. It should work, no problem.
If it’s not working, you may have missed an installation step from above.
Secondly, you’ll need to update and redirect your site to point to the https:// version to avoid duplicate content errors.
Regardless of whether you use WordPress, Jekyll, or some other platform, make sure all your links get updated to use the new https:// version of the site. This could be through the use of plugins, or redirecting everything from the .htaccess and combing through your content to update the inner links appropriately.
(If you’ve got questions about how to do this, just ask in the comments below.)
Conclusion
In the end, getting SSL certificates installed on a VPS isn’t nearly as complicated as I thought it would be. Not to mention, if you offer hosting to your clients, you can start offering this as a service at a reasonable price without adding too much hassle to your existing process.
At the very least, getting SSL running on your own sites is now a really simple process that costs nothing but about 10-15 minutes of learning. (Oh hello, Stripe, you sexy beast…)
To be fair, I’m new to this process. I’m sure there are even easier and/or more thorough ways to capture this whole process. But, this is what’s working for me right now and I wanted to help everyone else get started on encrypting their sites as well.
Have you tried encrypting your sites before? What troubles have you run into? Let me know about your encryption experiences, advice, and questions in the comments below.